
Full disk encryption (FDE) converts every file on a drive, the operating system included, into unreadable ciphertext that only unlocks with the correct key. It protects data at rest, meaning the moment a laptop is stolen, powered off, or sitting unattended in a hotel room. If you store client files, financial records, or anything you’d rather not see leaked, the verdict is simple: enable it.
Almost everyone who carries a laptop or stores confidential material should turn FDE on. It’s not just for IT departments or regulated industries; it’s baseline hygiene, the same way a locked front door is baseline hygiene for a house.
Before you read further, check your own status:
- Windows: Settings > Privacy & Security > Device Encryption (or search “BitLocker”).
- macOS: System Settings > Privacy & Security > FileVault.
- Linux: Run
lsblkorcryptsetup status <device>in a terminal.
Key Takeaways
Full disk encryption protects data at rest through a layered key system, but it requires backed-up recovery keys and complementary security controls to work as intended.
| Point | Details |
|---|---|
| FDE encrypts everything | It locks the OS, apps, and files at the block level, unlike file-level encryption, which only covers selected documents. |
| Recovery keys are irreplaceable | Losing both your password and recovery key means permanently unrecoverable data, with no backdoor. |
| Encryption time varies widely | Initial encryption typically takes a variable amount of time depending mainly on drive size, drive type, and how much data is already stored on it; small SSDs generally complete quite quickly, while large, nearly full HDDs require a longer process lasting several hours. |
| FDE has limits | It doesn’t stop malware, remote attacks, or ransomware on a running, unlocked system. |
| Professional help scales safely | 247techify supports fleet-wide encryption, key escrow, and compliance documentation for regulated businesses. |
Table of Contents
- What Full Disk Encryption Means Compared to File-Level Encryption
- How Does Disk Encryption Work Under the Hood?
- How Do I Enable Encryption on Windows, macOS, or Linux?
- How Do I Back Up My Recovery Key Safely?
- What Doesn’t Full Disk Encryption Protect Against?
- How Long Does Full Disk Encryption Take?
- Checklist: Before, During, and After Enabling Encryption
- When Should You Call In Professional Help?
- Our Take: FDE Belongs on Every Device That Holds Sensitive Data
- Get Encryption Deployed Right the First Time
- Where to Learn More
- Sources
- FAQ
What Full Disk Encryption Means Compared to File-Level Encryption
Full disk encryption locks an entire storage volume at the block level, the operating system, applications, temporary files, swap space, and every document on it. File-level or folder-level encryption, by contrast, only protects the specific files you choose, leaving system logs, cached credentials, and browser history exposed. That gap matters more than most people realize: a forensic tool pointed at an unencrypted drive can often reconstruct plenty from leftover temp files even if your “important” documents were individually locked.
Disk encryption software that operates at the block level closes that gap by encrypting everything before it ever touches the disk.
Three groups benefit most:
- Individuals with sensitive personal files — tax records, medical documents, personal photos.
- Small-business users handling client data — contracts, health records, payment details subject to compliance rules.
- Frequent travelers — laptops crossing borders or left in hotel safes face a meaningfully higher theft risk.
Typical use cases include laptops (the highest-risk category, since they leave the office), external backup drives, and devices being retired or resold, where a quick wipe isn’t enough insurance against data recovery tools.
How Does Disk Encryption Work Under the Hood?
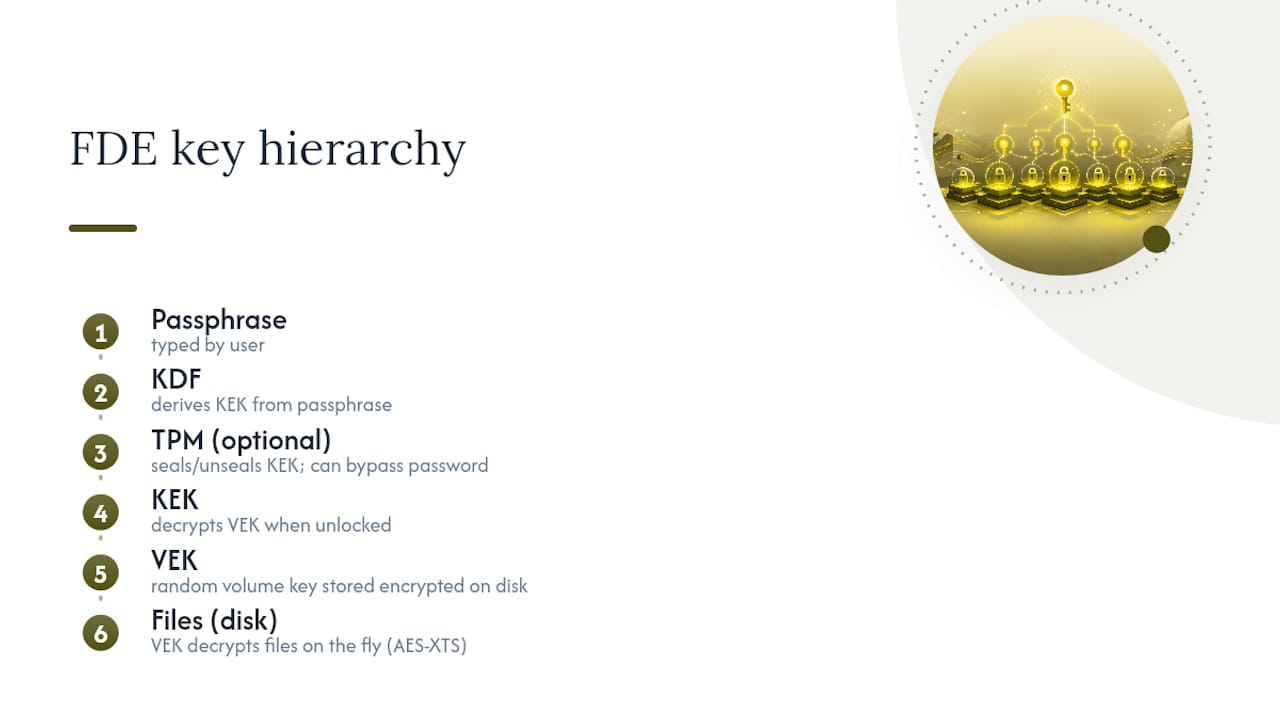
Full disk encryption works by generating a random volume encryption key (VEK) when you first enable it, and that key stays encrypted on the disk itself until you unlock the device. Your password never encrypts the data directly. Instead, it unlocks the key that unlocks the data, an extra layer that lets you change your password without re-encrypting the entire drive.

Here’s the chain: you type a passphrase, a key derivation function (KDF) transforms it into a key encryption key (KEK), and the KEK decrypts the VEK, which then decrypts your files on the fly. Windows and macOS lean on platform-specific KDFs, while LUKS2 on Linux supports Argon2id for this step, a function deliberately designed to resist GPU-based cracking attempts. The actual disk encryption almost universally runs on AES-XTS, a cipher mode built specifically for storage rather than network traffic.
A Trusted Platform Module (TPM), a small security chip soldered to the motherboard, can seal the KEK to specific boot measurements instead of requiring a password every time. This is convenient. It also changes your threat model: TPM-backed unlock can leave a stolen device vulnerable if an attacker gets it while still powered on and the platform state hasn’t changed, since the chip may release the key without ever asking for a PIN.
Sealing a key to a TPM buys convenience at the cost of a subtle trade-off: the chip trusts the boot state, not the person typing. A PIN alongside TPM unlock closes that gap for anyone handling higher-risk data.
Every FDE scheme has to solve what’s known as the boot-key problem: something has to be readable before authentication happens, or the machine can’t even ask for your password. That’s why some implementations leave the master boot record or EFI system partition unencrypted, a small, necessary exception rather than a flaw. A true fully encrypted boot chain generally requires self-encrypting drive hardware or vendor-specific firmware features.
Picture a diagram here: a locked disk icon at the bottom, an arrow up through “KDF” and “KEK” boxes, feeding into a “VEK” box that unlocks a stack of file icons, with a small TPM chip icon feeding the KEK stage as an optional shortcut around the password prompt.
How Do I Enable Encryption on Windows, macOS, or Linux?
The short version: turn on BitLocker in Windows Settings, enable FileVault under macOS Privacy & Security, or select disk encryption during a Linux install to activate LUKS. Each path has its own quirks worth knowing before you click “encrypt.”

Windows: BitLocker
BitLocker generally requires a TPM chip (version 1.2 or higher, though 2.0 is now standard) and UEFI firmware with Secure Boot enabled. Most laptops built in the last several years qualify by default.
- Check status at Settings > Privacy & Security > Device Encryption, or search “Manage BitLocker” for the full control panel.
- If disabled, click “Turn on BitLocker” and follow the prompts.
- Choose how to back up your recovery key when asked.
Here’s the catch: if you sign in with a Microsoft account, Windows may automatically escrow your recovery key to Microsoft’s servers. Convenient for average users, but that default behavior carries privacy and threat-model implications worth considering if you handle sensitive client data. Print the key or save it to an offline USB drive instead if your threat model calls for it.
macOS: FileVault
Modern Macs with a T2 chip or Apple Silicon route FileVault’s encryption through the Secure Enclave, a dedicated security processor separate from the main CPU.
- Go to System Settings > Privacy & Security > FileVault.
- Click “Turn On” and choose between an iCloud-based recovery key or a local recovery key you store yourself.
- Wait for encryption to complete in the background; you can keep working during this step.
iCloud escrow is easy to recover from if you forget your password, but it also means Apple could theoretically be compelled to hand over that key under legal process. A local recovery key stored offline avoids that exposure entirely.
Linux: LUKS and LUKS2
Most distributions offer disk encryption as a checkbox during installation, using LUKS2 by default with AES-256 in XTS mode.
- Check status with
sudo cryptsetup status <mapper-name>orlsblkto confirm a volume shows ascrypt. - If not encrypted and you’re comfortable with a reinstall, choose the encryption option during setup.
- For TPM-backed automatic unlock, tools like
systemd-cryptenrollor Clevis can bind the key to the TPM, removing the manual passphrase step at boot.
Back up the LUKS header itself, not just the passphrase. Header corruption or loss makes the entire volume permanently unrecoverable, even if you remember your password perfectly.
For external drives, Windows offers BitLocker To Go, macOS supports encrypted APFS volumes natively, and VeraCrypt remains a solid cross-platform option when you need one encrypted drive to move between operating systems.
Pro Tip: Back up your entire drive before starting encryption, then immediately verify completion afterward by rechecking the status command or settings panel for your OS. Don’t assume the process finished just because the progress bar disappeared.
How Do I Back Up My Recovery Key Safely?
Always back up your recovery key, and for LUKS specifically, back up the header too. Losing both your password and your recovery key means your data is gone permanently. There’s no backdoor built into properly implemented FDE; that irrecoverability is the entire point of the security model.
Reasonable backup options include:
- A printed copy stored in a home safe or safety deposit box.
- A reputable password manager with offline export capability.
- An offline encrypted USB drive kept separate from the encrypted device itself.
- Enterprise key escrow for businesses managing multiple devices at once.
Avoid storing recovery keys in searchable cloud notes apps or emailing them to yourself. Both create a paper trail an attacker could find with a simple account compromise.
Pro Tip: If you can, test your recovery key on a noncritical drive before you need it for real. Keep at least two copies in physically separate locations, since a house fire or flood shouldn’t be able to take out your only backup along with the original device.
What Doesn’t Full Disk Encryption Protect Against?
FDE protects data at rest, meaning a device that’s powered off or fully hibernated. It does nothing for a running, unlocked system facing malware, remote intrusion, or someone with physical access while you’re logged in. That distinction trips up a lot of people who assume encryption is a complete security solution rather than one layer of it.
Specific gaps to know about:
- Cold-boot attacks: an attacker with physical access to a running or recently-suspended machine can sometimes pull encryption keys directly from RAM before the data fully clears.
- Suspended state weaknesses: sleep mode keeps memory powered and potentially exposed; hibernation forces a full shutdown and is the safer choice for encrypted devices left unattended.
- Bootkits: malware that compromises the boot process itself can undermine encryption before the OS even loads.
- Malware with local access: once you’ve logged in and the disk is decrypted, ransomware or spyware sees the same files you do.
Ransomware note: encryption at the disk level doesn’t stop ransomware from encrypting your files a second time, maliciously, once the system is running. Pairing FDE with immutable backups gives you a real recovery path that encryption alone can’t provide. Endpoint detection, secure boot, and current firmware round out the picture.
How Long Does Full Disk Encryption Take?
Initial encryption time depends mostly on drive size, drive type, and how full the disk already is, and it generally runs anywhere from a few minutes to several hours. A small, mostly-empty SSD might finish in under 15 minutes, while a large, nearly-full mechanical hard drive can take most of a workday.
Rough scenarios:
- 256GB SSD, half full: typically 20 to 45 minutes.
- 1TB SSD, mostly full: roughly 1 to 2 hours.
- 2TB HDD, nearly full: several hours, sometimes overnight.
Once encryption finishes, modern SSDs show little perceptible slowdown in daily use, since most current processors include dedicated AES instruction sets that handle the math almost for free. Older mechanical drives, especially under heavy swap or virtual memory use, can show more noticeable lag.
Performance tip: start encryption during off-hours, plug laptops into power rather than relying on battery, and avoid heavy multitasking until the initial pass completes.
Checklist: Before, During, and After Enabling Encryption
Following a short checklist cuts your risk of data loss to nearly zero and keeps recovery options solid if something goes wrong.
Before you start:
- Complete a full backup of your data to a separate drive or cloud service.
- Confirm TPM presence and that UEFI/Secure Boot is enabled in firmware settings.
- Update your OS and firmware to the latest stable versions.
- Check for known compatibility issues with your specific hardware model.
During encryption:
- Follow your OS vendor’s official steps exactly, without skipping prompts.
- Store the recovery key the moment it’s generated, before you forget.
- Don’t interrupt power or force a shutdown mid-process.
- Confirm the encryption reaches 100% before treating the device as secure.
After encryption:
- Recheck status through your OS settings or a terminal command.
- Store at least one offline copy of the recovery key.
- Add the encrypted device to your existing backup and disaster recovery plan.
- Periodically test that your recovery key actually works.
When Should You Call In Professional Help?
Get professional support when devices hold regulated data, when you’re managing more than a handful of machines, or when TPM, firmware, or boot errors show up mid-process. A single home laptop is usually a DIY job. A ten-person accounting firm with client tax records on every workstation is a different problem entirely.
Scenarios that typically call for outside expertise:
- Enterprise-wide key escrow across dozens or hundreds of endpoints.
- Recovery after a corrupted LUKS header or lost BitLocker recovery key.
- Mass deployment tied to onboarding new hires or replacing hardware fleets.
- Compliance documentation for audits under frameworks like HIPAA or PCI-DSS.
The payoff for bringing in a managed provider is straightforward: less downtime during rollout, key escrow that’s actually tested rather than assumed to work, and documentation ready when an auditor asks for it. If your business fits any of those scenarios, that’s the line where DIY stops being the efficient option.
Our Take: FDE Belongs on Every Device That Holds Sensitive Data
We treat full disk encryption as a non-optional baseline control, not an advanced feature reserved for security teams. Across the client base we support, the businesses that get burned hardest by a lost laptop are almost never the ones that had encryption running. They’re the ones who meant to enable it eventually.
Regulated clients in healthcare and finance ask about this most often, usually after an audit flags it, though the same logic applies to any small business holding client contracts or payment information. If your fleet spans more than a few devices, proper IT infrastructure planning makes encryption one line item among several, not a standalone project.
Get Encryption Deployed Right the First Time
247techify handles full disk encryption the way it should be handled for a business: deployed across your entire device fleet, with recovery keys properly escrowed instead of scattered across sticky notes and personal cloud accounts.
Our approach covers the parts individual users often skip, tested recovery procedures so a corrupted header doesn’t mean permanent data loss, compliance documentation ready for HIPAA or PCI-DSS audits, and 24/7 support if something goes wrong at 2 a.m. before a big presentation. For businesses juggling this alongside a dozen other security priorities, that combination matters more than any single feature. If your team needs encryption rolled out across multiple devices or you’re recovering from a lockout right now, reach out to our managed IT services team for a quote.
Where to Learn More
For official steps straight from the source, check Microsoft’s BitLocker documentation, Apple’s FileVault support pages, and the Ubuntu full disk encryption guide for LUKS2 specifics. The TechTarget FDE explainer covers boot-partition exceptions in more depth, and Secure-OS’s comparison breaks down TPM trade-offs across platforms.
Sources
- Ubuntu documentation — Full disk encryption (FDE)
- Secure-OS — Full Disk Encryption in 2026: LUKS, BitLocker, FileVault and VeraCrypt Compared
- UTEP — How to check for encryption on macOS (time/performance guidance)
FAQ
Is Full Disk Encryption Necessary?
For anyone storing personal, financial, or client data on a laptop, yes. It’s the single most effective protection against data exposure if a device is lost or stolen, and regulated businesses often treat it as a compliance baseline.
How Long Does Full Disk Encryption Take?
Initial encryption typically takes anywhere from a few minutes to several hours, depending mainly on drive size, drive type, and how much data is already stored on it.
What Does Full Disk Encryption Mean?
It means every piece of data on a drive, including the operating system, is converted to unreadable ciphertext until unlocked with the correct key, protecting the entire volume rather than just selected files.
How Do I Check If I Have Full Disk Encryption Enabled?
Check Device Encryption or BitLocker status in Windows Settings, FileVault under macOS Privacy & Security, or run lsblk or cryptsetup status in a Linux terminal.
Should I Handle Encryption Myself or Get Help?
Individual devices are usually fine to encrypt yourself following vendor steps. Businesses managing multiple devices or regulated data often benefit from managed IT support like 247techify for escrow, recovery testing, and audit documentation.